Microsoft Teams transcription is a convenient feature built into Microsoft Teams that can save you time and effort taking notes during lengthy meetings. It might not seem like the most exciting feature Teams has to offer, particularly now that you can access everything from Immersive Spaces to an AI Copilot on the platform – but it comes in handy.
Automatic meeting transcriptions are great for when you need to review meeting content at a later date, catch up with minutes you’ve missed, or even improve accessibility.
So, how do you enable Microsoft Teams transcription?
I’ve created this step-by-step guide to help you get started.
What is Microsoft Teams Transcription?
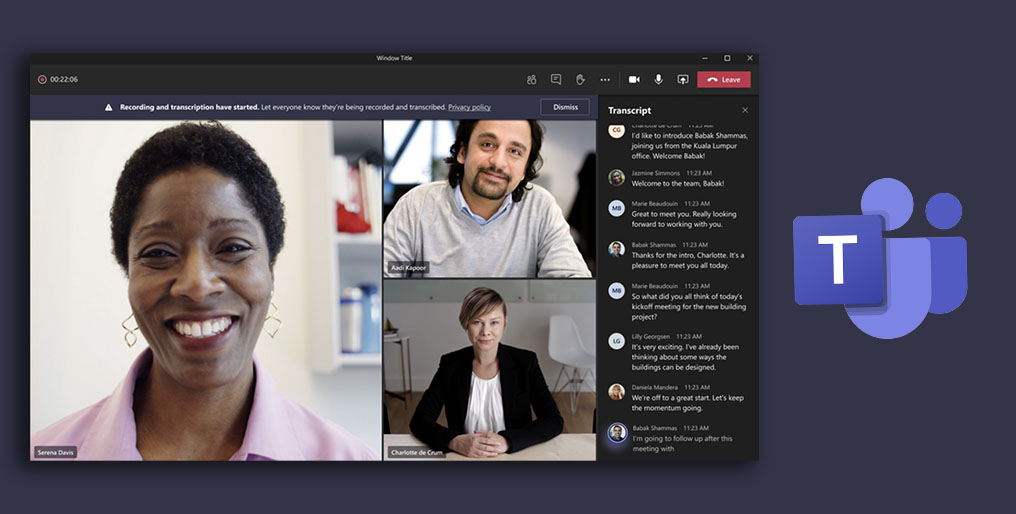
In Microsoft Teams meetings, and events, users have the option to enable automatic transcription. There are two ways you can access these transcriptions. Either you can download and share them alongside a recording of your meeting, or you can view transcriptions in real-time.
Notably, transcriptions aren’t quite the same as live captions, which disappear at the end of the meeting. Additionally, you can access captions with a Microsoft Teams free or personal account. Transcriptions, on the other hand, are only available on the desktop version of Teams for customers with specific premium licenses.
At the start of a meeting or event, you can enable transcription and recording, or you can simply keep transcription turned off, and just record the meeting. I’d recommend using the transcription setting for most conversations however. It just makes it a lot easier to search through content.
How to Enable Transcription in Microsoft Teams: Admin Guide
The first thing you’ll need to do if you want people to be able to access Microsoft Teams transcription features, is enable the feature for your team. You can enable transcriptions in two ways – the easiest option is definitely to just use the Microsoft Teams Admin Center.
Log into your Teams account as an admin and go to the Admin Center, then:
- Go to Meetings→ Meeting policies, then scroll down to Audio & video
- Toggle on “Allow transcription”
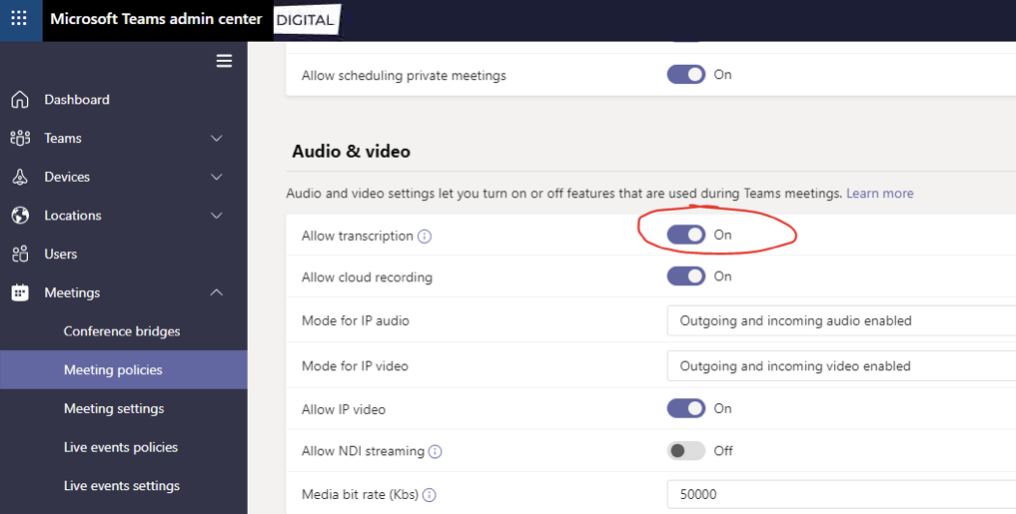
By default, transcripts will be shown in the language spoken during the conversation. However Microsoft Teams Premium customers can access live translated captions too. Again, admins just need to toggle “Transcription” to “On” to enable this.
Once you turn transcription settings on, you’ll be able to customize your settings a little more. For instance, you can create different policies within your admin center that allow you to give Microsoft Teams Transcription to all users (Global), or just certain team members.
You can also configure other settings within the Admin Center, such as:
- Enabling cloud recording
- Selecting a transcription storage destination (an average one-hour meeting takes up around 400MB between the recording and transcript, so make sure you have enough storage space)
There’s also the option to allow real-time captions, which display transcriptions during the call.
Enable Microsoft Teams Transcription with PowerShell
The second way to enable Transcription in Microsoft Teams, is to use PowerShell commands. This is a little trickier for beginners, but Microsoft has handily shared some helpful guidance to get you started. Basically, you’ll need to use the parameter “-AllowTranscription”, in the Set-CSTeamsMeetingPolicy section to enable transcription.
From there, you can give all your users transcriptions as part of the Global policy change.
If users have their own assigned policy, they won’t be a part of the Global policy. Admins can adjust this by using a cmdlet to remove policy assignments.
PowerShell also lets you set how many users can transcribe meetings, whether it’s all of them, most of them, or a select few.
You can also find instructions for configuring PowerShell options in the Microsoft documentation for Teams admins.
Bonus Option: Use a Third Party Tool
One other option you can consider if Microsoft Teams Transcription just doesn’t cut it for you, is to add an application to Microsoft Teams. Microsoft’s AI-powered transcription features are fantastic, but they do have some possible limitations. For instance, you can’t instantly generate summaries from them without using AI tools, or pinpoint action items.
If you want more functionality, then you could consider an AI meeting assistant or transcription tool from a vendor like Krisp, or Otter. You should be able to find plenty of apps that support transcription, translation and summarization in the Microsoft App store.
Just remember, some of these apps might come with extra monthly fees.
How to Enable Transcription in Microsoft Teams: For Users
Once admins enable transcription in Microsoft Teams, individual users need to turn the feature on when they attend a meeting. Notably, not everyone can access all transcription features.
Organizers and people from the same organization can all start, stop, and view transcriptions in real-time and after a meeting. Only the organizer can download transcripts and share them with other team members. People from other tenants, and anonymous users can’t access transcripts.
Additionally, with Teams Premium, admins and organizers can also assign more rules to who can transcribe meetings, assigning permissions to co-organizers, organizers, presenters, or no-one.
If you’re a user with permission to transcribe a meeting, here’s what you’ll need to do:
- Launch a meeting and go to the More Options section
- Choose Record and Transcribe – You can either record and transcribe the meeting, or just record the meeting without the transcription
All your meeting attendees will be notified that the transcription has begun, and they can choose to view it in real-time. If you want to stop the recording or transcription, just go back into the More Options menu.
Other Options for Microsoft Teams Transcription
There are a couple of ways to customize your transcription experience. While you can only create transcriptions in the language you’re speaking, Microsoft will automatically assume you’re speaking English. If you’re not, you can head to Transcription Settings at the top right of your live transcription window. Hover over the Spoken Language option, and choose the right language.
Hit Confirm, and the transcript should switch to your language. There are 41 languages to choose from, but altering this setting will change the language for all of your meeting participants.
Another option is to turn on Live Captions. You don’t necessarily need to do this, as you can view your transcript in real-time anyway on Microsoft Teams. However, if you’re just recording a meeting without the transcription, head to the More Actions button, and click on Language and Speech.
From there, choose Turn on live captions. Desktop users can change the caption language to their preferred “spoken language”, without affecting the rest of the team.
You can also enable CART (Communication access real-time translation) in Microsoft Teams. This basically means you give an URL for your meeting to a professional who can transcribe the meeting for you. This can be a slightly more accurate option for some complex meetings.