
As the volume and frequency of online meetings increase, it is essential to keep track of all the information shared and ensure it is retrievable for future reference. This is why meeting recordings are so important.
According to a 2021 survey by video technology company Panopto, 86 percent of daily video conferencing users would like meetings to be recorded and archived. Fortunately, nearly every conferencing tool and video collaboration platform allow users to record calls, provided they natively have the appropriate permissions. It is no longer necessary to use a third-party recording tool or service. Meetings can be recorded, stored, shared, and even analyzed directly from the platform where it is hosted. Cisco’s video conferencing tool Webex, too, offers this feature.
Understanding the Webex Meeting Recordings Feature
The meeting recording feature on Cisco Webex allows users to record a conversation for future access, either by those who could not attend the meeting or for reference/audit purposes. For instance, organizations may want to record all HR meetings that happen remotely for organizational compliance. Recordings also help to document free-flowing brainstorming sessions so that participants can revisit the meeting if they want and glean other ideas.
Interestingly, the Cisco Webex meeting recording feature captures all the media exchanged during the meeting, including audio, presentations, and the video stream. The file is saved in an MP4 format, and the option to record a session is available only to the host, co-host, or meeting presenter.
How to Record a Webex Meeting on Desktop
Users can record meetings only when they join from their computer and not from a mobile device. Importantly, Webex meeting recordings are also unavailable on Chromebooks, as the Webex desktop app does not run on machines with ChromeOS.
The feature supports recordings of two types – meeting recordings on the cloud or stored locally on the PC. Here are the steps to follow:
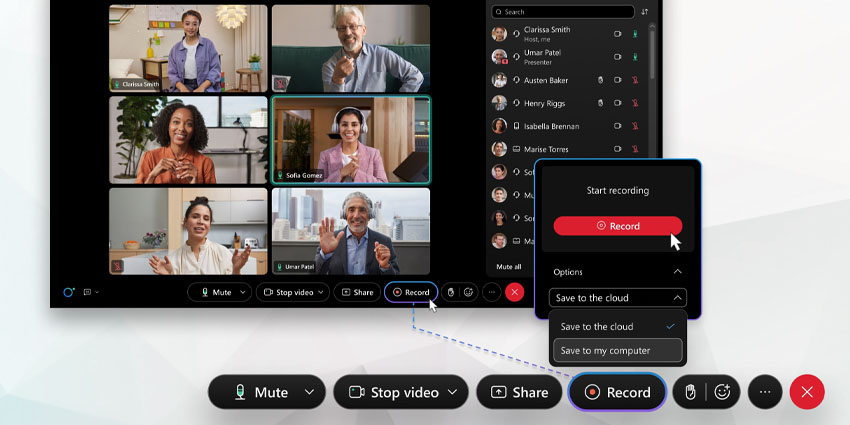
1. On the bottom pane of the Webex window, below the video feed, find the Record button. Make sure that you are either a host, cohost or presenter – otherwise, the option will not be available.
2. Click on Record. This opens a pop-up menu where you can start recording. You will see two options below the Red Record button – Save to my computer or Save to the cloud. Select your preferred option, and click on Record.
Note: The Save to my computer option may not be accessible to every user. In that case, contact your Webex administrator.
3. The recording will automatically begin. However, if Webex is connected to audio using a non-computer source (e.g., a headset), it will not be able to record the audio portion of the call. At this step, you will see a warning message if the Call Using Computer option was not previously selected. The recording will continue, just without a video component.
4. While the meeting is ongoing, you can pause/resume recording to capture only the most relevant parts. You can also stop the recording at any time and record only a specific section of the video meeting.
5. If you have not stopped the recording mid-way during the call, it will stop automatically once the meeting ends, and the file will be saved to your computer.
How to Record a Webex Meeting on Desktop
Users can record meetings only when they join from their computer and not from a mobile device. Importantly, Webex meeting recordings are also unavailable on Chromebooks, as the Webex desktop app does not run on machines with ChromeOS.
The feature supports recordings of two types – meeting recordings on the cloud or stored locally on the PC. Here are the steps to follow:
1. On the bottom pane of the Webex window, below the video feed, find the Record button. Make sure that you are either a host, cohost or presenter – otherwise, the option will not be available.
2. Click on Record. This opens a pop-up menu where you can start recording. You will see two options below the Red Record button – Save to my computer or Save to the cloud. Select your preferred option, and click on Record.
Note: The Save to my computer option may not be accessible to every user. In that case, contact your Webex administrator.
3. The recording will automatically begin. However, if Webex is connected to audio using a non-computer source (e.g., a headset), it will not be able to record the audio portion of the call. At this step, you will see a warning message if the Call Using Computer option was not previously selected. The recording will continue, just without a video component.
4. While the meeting is ongoing, you can pause/resume recording to capture only the most relevant parts. You can also stop the recording at any time and record only a specific section of the video meeting.
5. If you have not stopped the recording mid-way during the call, it will stop automatically once the meeting ends, and the file will be saved to your computer.
How to Retrieve Past Meeting Recordings
Meeting recordings can be saved either locally or on the Cisco Webex cloud. To retrieve recordings on the cloud, sign in to your organization’s Webex site here. There will be a recordings section on the left navigation bar – click here to view a complete list of available recordings and their details. Keep in mind that large recordings can take some time to appear on the site, up to 24 hours. Only hosts can access recordings on the cloud; attendees will receive an email from the host containing a link to the recording file after the meeting ends.
On the local device, recordings are stored in the Documents folder on Windows by default. On Mac computers, users can access the files from the Home folder using Finder. These default storage paths can be changed, and you can select a different folder to save the recording file if desired.
You can search through your meeting repository at both cloud and PC locations to find a specific recording you need.
Caveats to Remember When Recording a Webex Meeting
While users can record an audio or video call in most scenarios, this feature has a few limitations. These include the following:
- Meetings that start on mobile devices cannot be recorded (even if you switch devices later).
- Co-hosts can record meetings only if the host is absent.
- Webex has a stage sync feature that allows meeting presenters to synchronize the display with other participants. If a user syncs their stage, the first person added to the stage will appear in the recording instead of the active speaker.
- The call must use computer audio to be able to record the audio stream during a meeting.
- Webex lets users superimpose their video feed on top of the presentation so that it looks like they are standing in front of the presentation screen. However, the video feed from the webcam will not show up in recordings.
- Site Administrators can enable audio transcription for meeting recordings, but this feature is not available in the free plan.
- In addition to meetings, users can also record Webex training sessions – but this feature is available to only the host or an alternate host.
How Much Does it Cost to Record a Webex Meeting?
Cisco Webex charges users for file storage, not the recording feature itself. Organizations subscribing to Webex Free, Starter, Plus, and Business plans can create and store recordings on their local device. Cloud-based storage is available only in Webex Starter, Plus, and Business plans, starting at $13.50 per host per month.
The recording feature has to be separately configured by the Webex site administrator for enterprise plans.