Microsoft Teams annotation is a helpful feature for collaborative meetings, webinars, and educational sessions. Powered by the Microsoft Whiteboard service, annotation allows users to draw on a presenter’s screen, add notes, and more.
If you’re looking for a way to keep participants in a meeting engaged or help everyone share ideas simultaneously, collaborative annotation is a great solution.
Microsoft also allows users to turn on annotation just for presenters. That means teachers and hosts can draw attention to specific points in a presentation, add notes, and draw around pieces of content. Today, we’re going to walk you through the steps of using Microsoft Teams annotation, so you can start taking advantage of the feature with your team.
Microsoft Teams Annotation: Getting Started
Before we dive in, it’s worth noting that Microsoft Teams annotation is still part of the public preview program for Microsoft. This means there may be additional changes to the feature in the coming months or when Microsoft updates to Teams 2.0.
To access the full capabilities of the feature, you’ll need to be enrolled in Microsoft Teams public preview program. You can also switch to the Public Preview mode on Teams at any time by clicking on Settings and More (…), followed by “About,” then “Public Preview.”
Since Microsoft Whiteboard powers Teams annotation, you’ll need to enable the Whiteboard app for your organization too. You can restrict or allow access to the whiteboard for everyone using the Microsoft 365 admin center. There are also options to set up conditional access policies with Azure Active Directory or Show/Hide whiteboards for specific users in a Teams meeting.
Within the Microsoft 365 admin center, use the search box to look for “Whiteboard,” then click on “Whiteboard settings.” On the panel that appears, turn on the whiteboard for your organization, and select “Save.”
One final note is that the Whiteboard feature might not work correctly if you have GPU hardware acceleration turned on. This issue should be removed in upcoming versions of Teams. However, you can temporarily disable GPU hardware acceleration in the “Settings” section of Teams.
How to Use Microsoft Teams Annotation
Now that the correct settings are enabled on Teams, you should be able to start annotating during any meeting on a desktop. Notably, while you can’t start an annotation session from a mobile device, you can contribute to the discussion if a presenter shares their screen from a desktop.
To begin a session on a desktop, you’ll need to start a meeting on Teams and click on “share screen” to show your screen to other users.
![]()
When your screen starts sharing, select the annotation icon (the image that looks like a pen). You’ll be prompted to decide if only you should be able to annotate or if everyone in your meeting will be able to draw on the screen. If you allow everyone to annotate, the red border that shows the part of your screen being shared will switch to blue.
Everyone in the meeting will then see an annotation toolbar, with the red pen automatically selected. There are various tools on the menu, including:
- Laser pointer: Draw attention to a specific part of the screen.
- Pen: Draw on the screen with a pen tool.
- Highlighter: Highlight specific content in your chosen color.
- Sticky note: Add a sticky note (in any color) to the screen.
- Add text: Type text on the screen.
- Add shape or line: Create a shape or line in your content.
- React: Add an emoji reaction to the screen.
- Undo/Redo: Erase or re-do your previous action.
- Clear: Remove all current annotations.
- Settings: Adjust your annotation settings.

Changing Microsoft Annotation Settings
If you click on the Gear icon for settings during a Microsoft annotation session, you can explore various options. Here, you can switch between allowing everyone to draw on your screen or taking complete control of annotation yourself.
There’s also a “Help” and “About” tab, where you can find troubleshooting information and insights about how the annotation tool works.
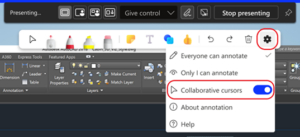
The “Settings” section also allows users to turn on collaborative cursors. When you toggle this feature, every participant will receive a cursor with their name attached. This ensures you can track who is making changes to your screen.
Once you’re done with the annotation session, simply tap the pen button at the top of the screen again to stop annotating. You can then continue with your meeting or close the session.
Keep in mind during a meeting; users can take screenshots of the annotated screen so that they can reference the content later. However, this is only an option for Windows users at the moment. If you’re using a Mac or another device, it might be best to use another tool to record your screen.
Troubleshooting Issues with Microsoft Teams Annotation
Since Microsoft Teams annotation is still a reasonably new feature, there may occasionally be some issues with the service. For instance, currently, you won’t be able to start a session from your mobile device or take screenshots on a Mac.
If you don’t see the option to use annotation in a meeting at all, Microsoft recommends going to your “Settings” section in Teams and clicking on “General.” Here, you can disable GPU hardware acceleration in your application.
If you’re still encountering problems, restarting the Microsoft Teams application or updating the service could help to counteract the problem.
Best Practices for Using Annotation in Teams Meetings
Microsoft Teams annotation is a relatively straightforward feature. It’s similar to many of the whiteboarding and annotation tools available from other vendors. You shouldn’t have too much trouble getting the service up and running. But if you want to boost your chances of a successful meeting, here are some top tips to get you started:
- Know when to enable annotation for everyone: In larger meetings, you may want to prevent everyone from annotating at the same time to avoid confusion.
- Use collaborative cursors: Switch on the collaborative cursor option in “settings.” This will allow you to track which users are active on your screen.
- Encourage users to customize their notes: Ask users to write notes and draw on the screen in different colors. You can change the color of the highlighter, pen, and sticky note tools on Microsoft Teams.
- Record your meeting: If some users can’t take screenshots during an annotation session, try recording the meeting. This way, you can check on information and action points later.
It’s worth keeping your Teams app up to date too. As the platform evolves, Microsoft may add new features and quality-of-life updates to the annotation service.